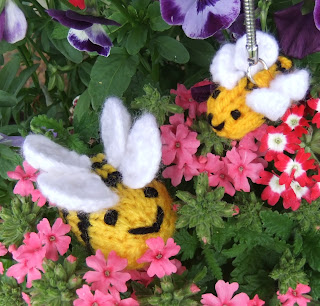
but I'm just going to knit some. They won't do much towards crop pollination, but neither do they sting. Feel free to knit my patterns for your personal use but not to sell.
As you can see, I've designed two sizes. I've put a keychain on the smaller version, but actually the bigger bee isn't too big for a keycharm. Both use small amounts of double knitting in yellow and black and smallish needles, to keep the knit quite tight. I used my trusty 3.25mm DPNS (UK 10, US 3) but it really doesn't matter too much, it's not as if they HAVE to be a particular size. Ordinary needles are fine for the bigger bee but DPNs (double pointed needles) make the smaller bee easier.
I'll start with the small bee, simply because I knitted him first! I used DPNs to avoid breaking the yarn at the end of each stripe, but if that's what you prefer to do, go for it! If you prefer to use normal needles, just alternate knit/purl and yellow/black, breaking and fastening as you go.
Cast on 5 stitches in Yellow
R1: Increase to 10 stitches by knitting into front and back of each stitch.
R2: purl
R3: knit
R4: purl
***If you're using DPNs, this is where they become useful***
***If you're NOT using DPNs, ignore the next bit - just alternate black and yellow to make black and yellow stripes, one row each. Finish with black at R11 below.
do not cut yellow R5: in Black, knit.
Slide stitches back to the other end of the DPN to pick up the yellow yarn, R6: knit in yellow
both yarns are now at the same end. Turn, R7: purl in black,
slide stitches again, R8: purl in yellow
R9: knit black
R10: knit yellow
R11: p2 together in black, cut both yarns, draw through black and fasten off. Use yellow end to sew seam, stuffing as you go. Embroider eyes and smile.
Wings (make 4 in white)
Cast on 10 stitches, cut yarn leaving a long end and pull through to form a circular wing (you may need to sew an additional stitch or two to form the circle) Stitch in place. If you're going to attach a keychain, leave a gap between the wings! I overlapped front/back slightly for effect.
Cast on 5 stitches in yellow
R1: Increase to 10 stitches by knitting into front and back of each stitch.
R2: purl
R3: Increase to 20 stitches by knitting into front and back of each stitch.
R4: purl
R5: knit
R6: purl
don't break yellow, but join in black and continue in stocking stitch begin 2row stripes
R7: knit in black
R8: purl in black
R9: knit in yellow
R10: purl in yellow
Repeat last four rows till you have 3 black stripes, ending with a yellow stripe. Break yellow leaving a long end for sewing up.
Next row: knit black
final row: purl 2 together in black to end, break off black leaving sufficient yarn to draw through stitches and fasten off.
Sew seam, stuffing as you go. You might like to embroider the face before seaming but it's easier to work out where they eyes "go" afterwards!
Wings (make 4, white)
Cast on 20 stitches
R1: knit
R2: K2 together to end, cut yarn leaving a long end. Draw through stitches tightly. This will give you a "pacman" shape. Take a couple of stitches through the cast-on ends to form a circular wing, stitch in place on bee's back.
And that's it folks! As always, let me know please if you find an error, I'm not used to writing my patterns down for others to read. I'd love to hear from you if you do knit my bees.


5 comments:
SUPER cute!!!
Ooh you wrote down a pattern?!!!?! I like the sliding trick, what a clever idea, I shall remember that for future use. Thank you!
Marvellous - love them!! Thank you :)
I have just finished your big bee for the top of a tea cosy that I made in the shape of a beehive. It looks great! Thank you for your pattern, it was so easy to follow and to knit.
thanks Ronnell, sounds very cosy!!
Post a Comment