Friday 28 June 2013

Buzz, buzz, buzz: knitting pattern for buzzy bees!


Did you know that bees are in decline? Friends of the Earth are organising a summit, Donna Noble thinks that Dr Who is involved...


but I'm just going to knit some. They won't do much towards crop pollination, but neither do they sting. Feel free to knit my patterns for your personal use but not to sell.

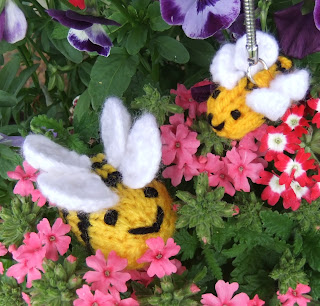
As you can see, I've designed two sizes. I've put a keychain on the smaller version, but actually the bigger bee isn't too big for a keycharm. Both use small amounts of double knitting in yellow and black and smallish needles, to keep the knit quite tight. I used my trusty 3.25mm DPNS (UK 10, US 3) but it really doesn't matter too much, it's not as if they HAVE to be a particular size. Ordinary needles are fine for the bigger bee but DPNs (double pointed needles) make the smaller bee easier.


I'll start with the small bee, simply because I knitted him first! I used DPNs to avoid breaking the yarn at the end of each stripe, but if that's what you prefer to do, go for it! If you prefer to use normal needles, just alternate knit/purl and yellow/black, breaking and fastening as you go.


Cast on 5 stitches in Yellow
R1: Increase to 10 stitches by knitting into front and back of each stitch.
R2: purl
R3: knit
R4: purl

***If you're using DPNs, this is where they become useful*** 
***If you're NOT using DPNs, ignore the next bit - just alternate black and yellow to make black and yellow stripes, one row each. Finish with black at R11 below.

do not cut yellow R5: in Black, knit. 

Slide stitches back to the other end of the DPN to pick up the yellow yarn, R6: knit in yellow

both yarns are now at the same end. Turn, R7: purl in black, 
slide stitches again, R8: purl in yellow

R9: knit black
R10: knit yellow

R11: p2 together in black, cut both yarns, draw through black and fasten off. Use yellow end to sew seam, stuffing as you go. Embroider eyes and smile.

Wings (make 4 in white)
Cast on 10 stitches, cut yarn leaving a long end and pull through to form a circular wing (you may need to sew an additional stitch or two to form the circle) Stitch in place. If you're going to attach a keychain, leave a gap between the wings! I overlapped front/back slightly for effect.

bigger bee


You won't need DPNs for this one.

Cast on 5 stitches in yellow
R1: Increase to 10 stitches by knitting into front and back of each stitch.
R2: purl
R3: Increase to 20 stitches by knitting into front and back of each stitch.
R4: purl
R5: knit
R6: purl

don't break yellow, but join in black and continue in stocking stitch begin 2row stripes

R7: knit in black
R8: purl in black

R9: knit in yellow
R10: purl in yellow

Repeat last four rows till you have 3 black stripes, ending with a yellow stripe. Break yellow leaving a long end for sewing up.

Next row: knit black
final row: purl 2 together in black to end, break off black leaving sufficient yarn to draw through stitches and fasten off.

Sew seam, stuffing as you go. You might like to embroider the face before seaming but it's easier to work out where they eyes "go" afterwards!

Wings (make 4, white)

Cast on 20 stitches
R1: knit
R2: K2 together to end, cut yarn leaving a long end. Draw through stitches tightly. This will give you a "pacman" shape. Take a couple of stitches through the cast-on ends to form a circular wing, stitch in place on bee's back.

And that's it folks! As always, let me know please if you find an error, I'm not used to writing my patterns down for others to read. I'd love to hear from you if you do knit my bees.



Thursday 20 June 2013

Socks a la carte 2, toes up: knitting book review


I enjoyed knitting from book 1, knitting from the cuff down and had thought that "toes up" would be easier, especially with getting a good fit...not my experience so far though!I started this book review some weeks ago but couldn't understand the "star toe" pattern I was attempting. I'd hoped for a response to my request for clarification from the company, but none so far. I'm pretty sure this row of holes wasn't intended though!


These socks are knitted on sets of double pointed needles, which is what I work with most days so that's not a problem for me. However, the casting-on methods needed to allow knitting from both sides of the toe are horrible, very fiddly and not to my liking at all!

As in the previous book, I like the flip-chart layout so that I could choose which toe style to go with which cuff.


I was very pleased to see the owl design made so popular by Kate Davies and in fact I tried that out straight away...as a meerkat designer dress!

The socks proved more problematic though. I couldn't get the "star toe" to work, so next tried the "origami" toe. It requires a provisional cast on which isn't detailed in the book so I needed to turn to youtube to find a tutorial. I realise the book couldn't explain every possible cast-on method, but I wasn't expecting to need the net before I even started knitting!

I came a cropper with the shaping, using "sskwsl" which the book explains as "slip the next stitch knitwise; insert the needle point into the loop at the base of the next stitch. Knit the slipped stitch and the loop together through the back loops". Back to the book...and now I'm trying the short row toe. Seems to be working so far, I like using short rows for shaping so hopefully I've now found a pattern that I can get on with!

I shall report progress as and when - I'm using Sirdar Snuggly 4 ply in a lovely lavender shade, supplied by MinervaCrafts for the purposes of this review. Socks a la carte 2 was also supplied free of charge for the review. Hopefully now that I've found a starting point I can cope with I shall get on better with the remainder of the sock and its pair!


Sunday 16 June 2013

Not quite self-sufficient


I'm on a low cholesterol diet so MrNifty is encouraging me by growing salad leaves. The row that is shooting up is the appropriately-named rocket, the other more relaxed row is mixed leaves. The row that is hardly growing at all is spring onions, but I don't like them anyway! I'm not mad on salad, but it's definitely nicer to eat from the garden. We're thinning them by plucking, here's part of today's lunch...


Good thing we have moved, remember all the rabbits in our old garden? Don't think we'd have harvested much!

Tuesday 11 June 2013

Chickenfish roadtest!


May I introduce Pickle and Makurro? They're busy roadtesting the chickenfish prototype, bless their little furry tails! (They're not my own kittens, they belong to my son and his fiancee)

As you may be able to see, chickenfish has had lots of love and attention and is nicely furry, the felt has softened nicely but no stuffing has escaped. I'd call that a successful roadtest!

If you want to make one for yourself, I've posted my pattern here. I haven't yet had time to make any to sell, but I promise it's on my to-do list!

Thursday 6 June 2013

Chickenfish pattern


My first chickenfish is now undergoing roadtesting by two kittens belonging to my son and his fiancee and seems to be bearing up well, so I'm ready to share my pattern with you. 


As I've made it in honour of FosterDadJohn and his kittencam, I'd like to ask you to only make it for personal use unless you make a donation to purrfectpals, the charity that John fosters for. If you are wondering what I'm talking about, it's time you watched the kittencam!

You'll need yellow felt for the body, red felt for the fins and tail, optional wadding to pad the fins and tail, black and white felt for the eyes, and toy filling. I used a carrier bag full. I used straight and zigzag machine stitching and handsewed some parts.

 My felt was supplied by MinervaCrafts.com (thank you!) and you can read all about my struggles designing the pattern here and here. Details of materials used are at the bottom of the page.

Clicking on each picture will enlarge it. I've added measurements to help you to duplicate my efforts, but to be honest it isn't rocket science and your versions may well be better than mine! Additional details of how to sew your chickenfish are in my previous post here.


Fin: Make three the same. Fold each fin piece in half, sandwiching wadding between if you wish. Zigzag stitch around edges, add (optional) top stitched details. The folded edge will be sewn inside the body seam later.


Main body: Cut 6 "rainbow" shapes in yellow. Position and pin top fin halfway along outer edge of one body piece pointing down, then add the second body piece on top so that it will be inside when you sew the seam. That makes more sense in the pictures below. Sew outer and inner seams. I've allowed one centimetre (half an inch) as seam allowance.


The next photo show the body section turned the right way out, seam inside. Stuff with toy filling from each end. You *might* find sewing the tail on easier if you don't stuff yet, but it'll be very tricky stuffing the whole thing from just one open end. Judgement call!


The remaining two body pieces are sewn in the same way but the side fins are positioned nearer to the front (see photo below)


Pin chickenfish's rear ends together, folding a 1cm (half an inch) seam allowance at both ends and handstitch securely. Very securely! Kittenproof!

Tail: Place tail in position, matching the centre of the tail to the seam and handstitch securely.


Now add wadding (if used) and pin sides of tail together. Zigzag stitch as with fins, topstitch details (optional). You will probably need to finish by handsewing as the stuffing will prevent the machine getting up close!


Join front ends in same way, then position and pin top section and stitch in place. Take care to line up seams, it helps give chickenfish a face. 

Eyes: Cut two white circles to size (mine are 1" across because that was the size of the nearest round thing!) and two smaller black circles. Stitch together, then in position.


HAIL!

You are welcome to use this pattern free of charge for your own kitties, but if you choose to sell your chickenfish please make a donation to help support FosterDadJohn and all the others who help PurrfectPals.

I'm not a professional pattern writer (can you tell?) so if this fails to make sense, please let me know and I'll correct it. You can find more detailed sewing information in my previous post here.

I used 18" wide Plain Acrylic Craft Felt Fabric in Yellow (My 2.5 metre roll has made two chickenfish so far and have enough remaining for another two.)


The wadding came from my stash but I think Minerva's lightest weight wadding would be fine. 
Black and white felt also came from my stash, as did the toy filling. I used a carrier bag full, I don't know what weight of bag that would be, best to check before ordering! Minerva have filling and eyes if you prefer to use them.

I will be making A FEW chickenfish to sell, with a donation going to purrfectpals, so if you're interested please get in touch with me using the contact details at the top of the page or through my shops: Niftyknits at Etsy or Niftyknits at Folksy


Wednesday 5 June 2013

Chickenfish #2 (son of chickenfish?)


This is the photo that started my sewing adventure, many thanks to FosterDadJohn from the Critter Room for permission to use it, and of course don't miss the FosterKittenCam where you can see the original ChickenFish and find out why we say "HAIL!" :-)

You may have noticed some time has gone by since part !! There has been considerable scratching of head and much advice sought and given by people who are so much more experienced at sewing than I am. A big thank you is owing to MinervaCrafts.com who supplied my materials.

(Please note this is not a pattern as such, not yet, more an exploration of my sewing learning curve! the pattern will come later, and will be free to use with the suggestion that you help support the kitten cam by donating to PurrfectPals)

Jackie suggested trying gathering the fabric rather than the mass of tucks I'd tried last time, so I gave that a go:


The felt is quite thick though, so was too puckered. Worth a try though! 

My reason for trying to shape a rectangle rather than just cut out "rainbow shapes from the start was to save fabric, but Janine Basil asked me "Is the saved amount of fabric worth the amount of time taken to mark out and sew all the darts?" Oh so very true!

Back to my scrap fabric...

Here are the two together. No puckering, which is good, but somehow the arch has become too tight, and I could see that the "feet" need attention.


I cut my template in half and stretched it out a bit to give a wider arch, and also trimmed the ends to get a better angle. (Don't tell anyone, but I didn't think of this when I made the first one...)


So - on to the fins and tail. I cut a template for the fin and then doubled it with an extra seam allowance in the middle to allow me to sew it inside the seam.


I wanted the fins to be sturdy so I decided to add wadding between the two layers of felt. 


Felt doesn't fray, so no side seams - I just zigzagged along the edges. Feeling confident so added extra top stitching detail!


Yay we have fins! I cut my arch shapes from the rectangles that hadn't worked out, economical to the end! The scribbled bits at each end are my afterthoughts, these needed trimming. 


This was where it got complicated. I needed to make sure the fins were in the right place, and facing in the correct direction. The top fin is in the middle, the side fins are nearer the front - and need to match! I laid it in place, right side out, first (you can see where the seam allowance on the fin will slip inside the main seam).


Turned it down, ready to put on the top arch


Ready to pin and stitch. I sewed the top edge first so that I could turn it out and check. 


ooh it worked!


 After stuffing I could see that I was getting there!


Because felt doesn't fray I could have just oversewn the two sections together, but I thought that tucking in a seam allowance would be more secure. I was keen to keep the stuffing on the inside, and you know how sneaky little claws can be! I stitched the two sides together first, just at the back end.


I couldn't resist holding the other piece in place!


I wanted to make the tail really secure, so stitched it in stages. I cut it double on the fold like the fins, but no middle seam allowance this time. I cut some wadding to pad it out.


I lined up the middle of the tail along the seam at the back, making sure I matched the midpoints, then backstitched backwards and forwards, paying extra attention to each edge.


I put the wadding in the middle and pinned both edges together. 


I then zigzagged the edges as with the fins. I couldn't get right to the edges as the main part was already stuffed, so finished off by handstitching. You might like to stuff later, then the machining would be simpler. I didn't think of that!


Finally, it's time to stitch the front end in the same way as the back, then add the top. I was more concerned with making it cat-secure than with beautiful stitches and kept tugging the seam and putting in extra stitches wherever I saw a gap.


Eyes came next. I chose to make mine from felt circles, black on white, and stitched them in place.

And finally - to sit and guard my screen and admire the real-life counterpart! HAIL!


I will be writing another post with a pattern, but for now I hope you enjoyed my sewing journey!

I'd like to thank several people for helping with ideas, all have online shops that are well worth a peak!

JackieCardytextiles bags, brooches and more

www.janinebasil.com hat maker extraordinaire!

ModeAlisa dressmaker

HJDcrafts who even drew up a cutting plan for me!

SeeTheWoods accessories and cases for everything

and last but definitely not least MinervaCrafts.com who very kindly supplied the materials for this project. Their online store has grown even while I've been sewing, and they were helpful enough to pick out the matching thread for me when I couldn't decide which was best (it was 202)

I used 18" wide Plain Acrylic Craft Felt Fabric in Yellow (My 2.5 metre roll has made two chickenfish so far and have enough remaining for another two.)


The wadding came from my stash but I think Minerva's lightest weight wadding would be fine.

Black and white felt also came from my stash, as did the toy filling. I used a carrier bag full.

Tuesday 4 June 2013

Virtual Fossil Hunt!


Many of you know that fossil hunting is pretty much on the daily agenda here, so I thought I'd show how easy it is (not!). The first photo shows where we're going. This is the view from the garden fence, the exposed shingle at low tide is the best place to hunt. It's only a high low tide today, not a low low tide when more shingle is exposed. Before we moved here I didn't even know that the tides varied, other than low and high, but today's low tide is only 1.4m as opposed to 2.5m later in the month.


Here we are! Now it's *just* a case of eyeballing the shingle, best done from an undignified squat! We're looking for black fossil sharks teeth in a bed of black shingle. Easy peasy. When I spotted the first one I took a photo of it as I saw it, before I moved anything, but first I'll show you what you're looking for:


Now it's your turn to look for it! (You can enlarge the photo by clicking on it)


Got it yet? Same view, closer in:


It takes a while to get your eye in, as you can imagine. What usually catches my eye is the extreme sharpness or the straight edge. On the better examples there is a Y shaped root but we didn't find any like that today. If you can find the next one I'll be impressed! Here's what you're looking for:


And here's where I looked:


The fossil is towards the bottom, centre, in the photo above. Look for the round orange pebble


Spot it now?

In the next photo there is "something" pretty much in the centre. I don't know what it is, but it has regular lines that make me think it is a fossil rather than just a stone. I don't know though, do you?


 So these were today's finds. Not a huge crop, but we weren't out long, maybe half an hour.


Here's our total haul (so far), we moved here on March 1st but already had 4 of the 78 (!!) from an earlier hunt


These two are my favourites. The bigger one is - well - big! It shows the Y shape I mentioned earlier, that's the easiest thing to spot. The other one is ridiculously tiny, I don't know how I saw it!


We found the next fossil on our previous beach between Pett Level and Fairlight last year. The area was a river bed, and these are casts of tracks made by crustaceans (I think!)


We've also hunted at Folkestone, it's HORRIBLE underfoot, clambering over slippery boulders, but we persevered. Apparently the hunting is better if you work right at the cliff, but I'm not keen on danger! We found casts of ammonites and bits of ammonites:


 but my goodness we found lots!


On another day at our local beach MrNifty found this excellent piece of fossil wood embedded in a stone. It started to fall apart as soon as it dried, so I soaked it in yarn stiffener! did the job, probably not the obvious solution if you're not a knitter.


Last but not least - remember how paltry my seaglass collection was when last I showed you? 
It's grown!