Or maybe you just want an excuse to buy more? In case you haven't fallen for Gu desserts (really?), you could use any similar sized jar. They are about 3 inches across.
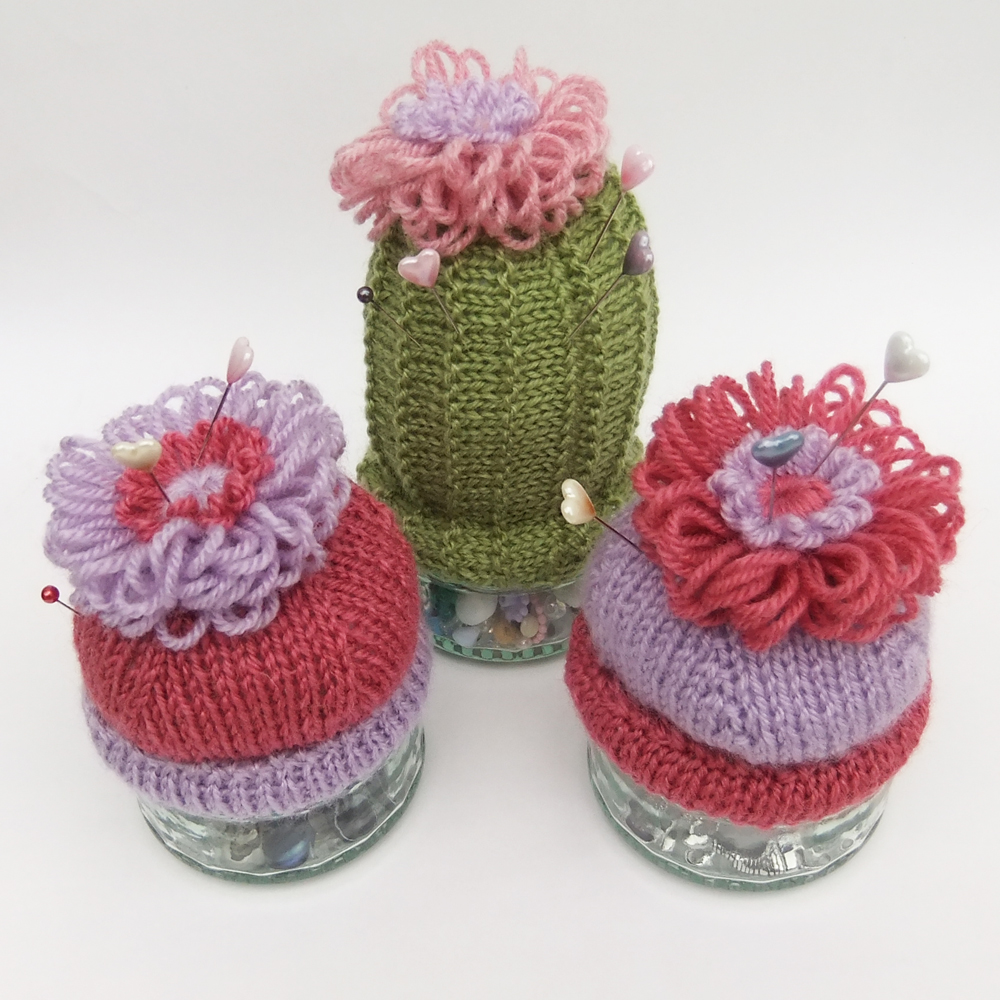
I love a bargain, so I've been indulging in some special offer desserts that come in little glass jars - but now I have a stash of little glass jars! I can't bring myself to throw them away and I've already seen quite a few in charity shops, so I decided it was time to think of a way to use them *drumroll* so I've got a couple of free patterns for you!
The jars are a perfect size for storing little bits and bobs, but have no lids. I've designed pin cushions which fit snuggly over the rim of the jar and keeping the contents safe at the same time. They don't take much yarn and are quick and easy to knit.
I've added flowers made on my flower loom, but you could use buttons, beads or shop-bought flowers - anything you fancy!
This pattern is for the pink/purple version. I like the contrasting colours, and it's a good stash-buster!
I used double-knit yarn and UK size 9 needles (3.75mm US size 5), but it's not too important. It's knitted in rows, and uses stocking stitch (1st row knit, 2nd row purl). All increasing is by knitting into front and back of same stitch, all decreasing is by knitting 2 together. You'll also need some filling - cotton wool would do if you don't have toy filling) and a short length of cord elastic.
Cast on 5 stitches in your main colour.
row 1: increase by knitting into front and back of next stitch (I'll call this "inc 1" in future), repeat to end = 10 stitches
row 2: purl
row 3: (K1, inc1) repeat to end = 15 stitches
row 4: purl
row 5: (K2, inc 1) repeat to end = 20 stitches
row 6: purl
row 7: (K3, inc 1) repeat to end = 25 stitches
row 8: purl
row 9: (K4, inc1) repeat to end = 30 stitches
row 10: purl
row 11: (K5, inc1) repeat to end = 35 stitches
row 12: purl
row 13: (K6, inc1) repeat to end = 40 stitches
row 14: purl
row 15: (K7, inc1) repeat to end = 45 stitches
row 16: purl
row 17: (K8, inc1) repeat to end = 50 stitches
Then work 3 rows stocking stitch. This will give you a height of about 4 inches including an inch and a half of jar. If you want it to be taller, work more rows.
Now decrease back to 10 stitches following the same structure:
row 21: (K8, K2 tog) to end = 45 stitches
row 22: purl
row 23: (K7, K2 tog) to end = 40 stitches
row 24: purl
row 25: (K6, K2 tog) to end = 35 stitches
row 26: purl
row 27: (K5, K2 tog) to end = 30 stitches
row 28: purl
row 29: (K4, K2 tog) to end = 25 stitches
row 30: purl
row 31: (K3, K2 tog) to end = 20 stitches
row 32: purl
row 33: (K2, K2 tog) to end = 15 stitches
row 34: purl
row 35: (K1, K2 tog) to end = 10 stitches

Cut yarn leaving long end, thread on sewing needle and pull through last 10 stitches. Sew row ends together but stuff before fastening seam completely.

Take a few last stitches back and forth between top and bottom to draw into a slight doughnut shape, this helps to bulge out the "equator" and sit more snugly.

Now for the bottom strip.
Cast on 50 stitches (in contrasting colour if you wish)
row 1: knit
row 2: purl
row 3: knit
row 4: purl
row 5: purl *this is not a mistake! it will give a useful purl ridge for threading the elastic.
row 6: purl
row 7: knit
row 8: purl
cast off, leave a long end.
Fold in half at the purl ridge and stitch to form one double strip.

Now measure a length of elastic long enough to go round the rim of the jar and enough over to knot securely - around 12 inches should do it. Using a needle, thread the elastic in and out of the purl ridge (I said it'd be useful!).

Place on jar and knot to fit, then stitch the two ends of the strip together. You can tuck the knotted end of the elastic inside at this point if you remember!
With the other edge of the elasticated strip pointing up from the rim, seat the other section on top and stitch in place. This is what it looks like without the jar from underneath (note it's the other colour variation) - actually, it works well as a pincushion without the jar, but that rather defeats the point of my plan to upcycle them!

Finally, embellish and make beautiful and fill your jar with bits and bobs!

More free patterns (including the green cactus shown here) available on my patterns page *click here*
Can't knit? Buy one from my folksy shop